Recently I switched from Chrome to Firefox (mainly due to Google’s invasive policy of suggesting me content that I really should see), but I wasn’t able to replicate one of the features that I love most in Chrome: easiness of adding custom search engines, so then you can type any given keyword in the address bar to use it.
Entries filed under Useful tools
Introduction to Apache Thrift – eMAG TechLabs article
After publishing my book on Apache Thrift I was asked to do some presentation for software developers in my company about this topic. As a follow up of the presentation I wrote an article preserving most of the presentation contents and adding some code examples. You can read it here.
My work inspiration
I was recently approached by curators of the Workspiration website to write about tools that I use in my work and sources of my inspiration.
You can read my entry here.
Calculate exchange rates with Alfred 2 workflow
NOTE: This technical article was published long time ago. It may be not up to date. Please check for the newest versions of mentioned software. Also I am not able to provide technical support anymore. Thank you for your understanding.
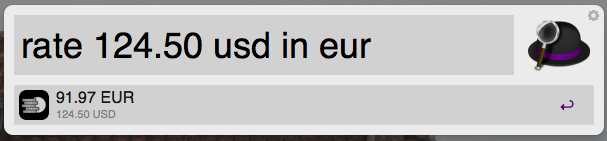
Alfred 2 is awesome productivity application for Mac OS X. It allows you to quickly search files, navigate web, run applications and many more. One of the great features of Alfred are workflows – custom actions, that can be triggered (and programmed) by the user.
As a solution to my frequent need of calculating the exchange rates between currencies, I made an Alfred 2 workflow that allows to do exactly that, using Google-like syntax, for example:
rate 123 USD in EUR
will yield result:
90.44 EUR
Here’s a screenshot:
alfred-currencies screenshot
You can download the workflow here. Installation instructions are on the project’s Github page, as well as the code and issue tracker.
Tools for effective communication in IT projects
One of the most important factors in the success or failure of any IT project is communication. Surprisingly, there are not many people, who can use the communication tools effectively. In the article published in the Smashing Magazine I provide an overview of basic tools, such as e-mail, issue trackers, and meetings.
How to intercept e-mail messages using E-MailRelay SMTP proxy
NOTE: This technical article was published long time ago. It may be not up to date. Please check for the newest versions of mentioned software. Also I am not able to provide technical support anymore. Thank you for your understanding.
Recently I had a suspicion, that my e-mail messages weren’t delivered properly. I use Gmail as a client, however some of my messages are fetched from and sent through the third party server. I was under the impression, that not all of the messages that I send are delivered to the recipient. This problem is hard to debug, because Gmail provides no logs nor client support, and it is also troublesome to get the information from my e-mail/hosting company every time I think something’s wrong.
Renew your CrashPlan subscription with discount exclusive for new users
NOTE: This technical article was published long time ago. It may be not up to date. Please check for the newest versions of mentioned software. Also I am not able to provide technical support anymore. Thank you for your understanding.
CrashPlan is pretty amazing backup solution – it provides multiple backup solutions for your personal data, including unlimited cloud storage, backup to friends or local devices and other. They charge $59.99 annually for unlimited plan (1 computer). Frequently (like, all the time) they offer large discounts (20% and more) for new users. However, they forget about existing users – if you want to extend your subscription, you need to pay full amount. When I asked them about that, they told me, that it is a technical difficulty to sort this out in their billing system.
I think it’s unfair for existing customers, who refer the service to their friends and families (i.e. I referred them to at least 4 or 5 paying customers). I found a way to extend your account with the discount in a couple of easy steps:
- Log into your CrashPlan account on their website.
- Find your subscription, cancel it. They will warn you, that all data will be deleted. What they won’t tell you is that they will not do it immediately – your data is still there for a couple of hours.
- At this moment go to the discount offer page (look at their website or facebook page), while still logged in.
- Buy the discounted subscription. You will receive new license key.
- In the CrashPlan application delete old license key and paste the new one.
- Enjoy your extended subscription at the discounted price 🙂
Note: this method is valid as of November 1, 2013.
Note2: I tried to use this method recently (November 1, 2015) and it doesn’t seem to be working anymore. If you were successful – please let me know!
Use multiple computers with one mouse and keyboard – Synergy
NOTE: This technical article was published long time ago. It may be not up to date. Please check for the newest versions of mentioned software. Also I am not able to provide technical support anymore. Thank you for your understanding.
Recently at my office we have set up extra machine with large screen to show project statistics, error notifications, occasional after-5pm-funny-videos, etc. (I plan to cover this subject in the future). Unfortunately, it is quite uncomfortable to work on this machine with head upwards all the time, stuck between two desks with mouse and keyboard on your laps.
That’s why I found a tool, that is great, when one wants to control multiple computers with just one keyboard and mouse: Synergy. This solution doesn’t require to set up any remote desktop connection or any special hardware. One doesn’t have to switch between the devices – you can move the cursor (and thus, the keyboard’s focus) from one computer to another. Furthermore, it’s multiplatform, so you can use it on the Mac, Windows and Linux machine on the same time. The software is built on the server-client architecture – computer with keyboard and mouse attached (i.e. your desktop computer) is server. It runs the service and all other devices should connect to this computer. You can use the other devices’ keyboard and mouses simultaneously on the respective devices, but only the server can move the cursor between the computers.
Configuration is straightforward: you have to install the application on every device you wish to use. Then, on the designated server, you should configure the computers that are allowed to connect (by designating simple names). You have to place every computer on the matrix. Then, start the server and on the clients – connect to the given server’s IP. That’s it.
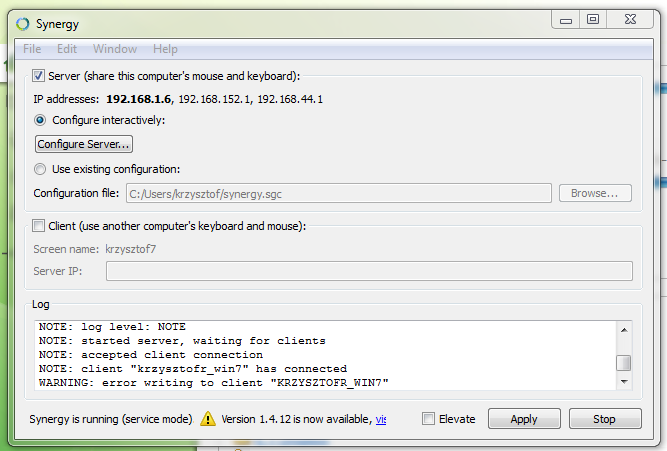
Main “Synergy” application screen.

Client configuration matrix – “Synergy”.
Awesome version control visualization with gource
NOTE: This technical article was published long time ago. It may be not up to date. Please check for the newest versions of mentioned software. Also I am not able to provide technical support anymore. Thank you for your understanding.
After a big project it is often cool to release “making of” video, presenting collaborative effort of people who contributed to the success. In case of designers, filmmakers or other “artistic” types it is quite easy to present their work in progress. But what about developers? They always sit at their desks and type on their keyboards, it looks the same at the beginning and at the end of the project – nothing spectacular.
A year ago, when we finished new version of www.k2.pl website I wanted to show – in light and comprehensive way – the vast amount of awesome work performed by my team. This is where gource came to the rescue. Gource is an awesome tool to visualize work on the codebase in form of colorful video. It takes information about the code structure, contributors and timing from logs of revision control tools (Git, Mercurial, SVN and Bazaar are supported). Code is presented as branches and leaves, being worked on by developer icons flying around. As the tool is highly parameterizable, it is easy to add colors, logos, backgrounds, etc., show or hide specific information.
You may easily play with the tool by yourself, so as a quick tutorial, here are the commands to generate simple video. You need gource itself and the FFmpeg library. These commands are Windows specific (as my Windows box is more powerful), but they’re easy to port to Linux. Try to play with the parameters by yourself.
First, of course, clone your repository to specific location. Then, run this command to create PPM file with the video (PPM file is a series of bitmap images, so expect this file to be huge):
"c:\program files (x86)\gource\gource.exe" -s 0.5 --hide filenames -1280x720 -o gource.ppm
Then, you need to convert the PPM file to compressed video:
C:\ffmpeg\bin\ffmpeg -y -r 60 -f image2pipe -vcodec ppm -i gource.ppm -vcodec libx264 -preset ultrafast -crf 1 -threads 0 -bf 0 gource.x264.avi
And voila, you have a nice video:
Good luck with preparing your own awesome visualizations 🙂
Monitoring your services with Papertrail and Heroku
NOTE: This technical article was published long time ago. It may be not up to date. Please check for the newest versions of mentioned software. Also I am not able to provide technical support anymore. Thank you for your understanding.
Recently I have noticed some problems with my Internet connection, sometimes it was completely unavailable. I concluded that I need some precise information about the outages, so I can talk to my ISP. As at the same time I learned about the Paper Trail service, I decided to use it in my setup. Other thing, that I wanted to learn was Heroku, so I gave it a try. Both services have some free tier, which is perfectly sufficient for my needs.
The architecture of my solution is as follows: I have local server running on Raspberry Pi (as mentioned in one of the previous posts about the online radio streaming). On this server, I have a Python script, running as a cron job every 10 minutes. This script sends simple log message to my Papertrail account. Then, I have another Python script, that runs every 10 minutes as a scheduled job on Heroku. This script checks, if there are recent “heartbeat” logs on Papertrail and if not – sends an e-mail message. You can download the source code of both scripts from the github repository.